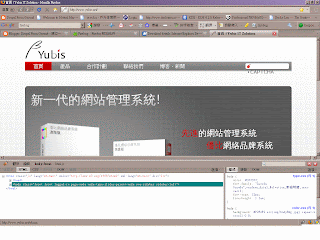
We are now developing a website with drupal for a client. As the website is quite complex and we need handle many CSS files for modules and themes. Today I suddenly found that there are some CSS statements cannot work at IE. I have spent some time on that and finally we found IE cannot load some CSS files we add at the last in .info files. I guess IE has the limitation on the numbe rof CSS files load. But I don't believe in it because this is a tooooooooooo stupid reason....
After I had found same conclusion from others. I admit that I have put too many hopeness on IE.
In our case, we have 30 CSS files loaded in IE.
reference:
http://www.redfinsolutions.com/redfin-blog/ie-7-and-ie-8-impose-31-css-file-limit-drupal-beware
Showing posts with label yubis it solution. Show all posts
Showing posts with label yubis it solution. Show all posts
Wednesday, November 11, 2009
Friday, October 30, 2009
Explore Google Wave
I just got the sandbox account of Google Wave. What is its potential on web development? How can I add a wavelet into Drupal? I am studying on it :)

Friday, August 7, 2009
How to make Float center -- By yubis IT Solutions
When I was doing Drupal site for Yubis, I encounter this problem: Menu links or other HTML elements can be made float left / right, but is it possible to make it float center?
Unfortunately, there's no such thing in CSS! What we can do is to play with a little trick. The key is to identitfy this: Left 50% and Right 50%!
Consider a menu link as follows:
<ul>
<li>Main Page < / li>
<li>Second Page < /li>
< / u l>
First, we make ul {position: relative; right:50%}
What you'll see is the whole menu link shifts to the right!
Final stpe is to shift this whole thing 50% to the left. So, make things like:
li {position: relative; left:50%}
It's done. Check again your work and you'll see the whole menu now is placed at the center.
PS. Check another reference here: http://www.wowbox.com.tw/blog/article.asp?id=3008
Unfortunately, there's no such thing in CSS! What we can do is to play with a little trick. The key is to identitfy this: Left 50% and Right 50%!
Consider a menu link as follows:
<ul>
<li>Main Page < / li>
< / u l>
First, we make ul {position: relative; right:50%}
What you'll see is the whole menu link shifts to the right!
Final stpe is to shift this whole thing 50% to the left. So, make things like:
li {position: relative; left:50%}
It's done. Check again your work and you'll see the whole menu now is placed at the center.
PS. Check another reference here: http://www.wowbox.com.tw/blog/article.asp?id=3008
Thursday, July 23, 2009
Drupal template file -- Created by Yubis IT Solutions
Drupal is driven by templates file. Basically, files ended in *.tpl.php are the template files.
node.tpl.php controls how the content should be displayed. For example, you don't want to add the comment link for the nodes, you may set it here.
block.tpl.php controls how the blocks should be displayed. Div class may be added to the blocks, which helps to let its layout be modified by CSS.
- page.tpl.php
- node.tpl.php
- block.tpl.php
node.tpl.php controls how the content should be displayed. For example, you don't want to add the comment link for the nodes, you may set it here.
block.tpl.php controls how the blocks should be displayed. Div class may be added to the blocks, which helps to let its layout be modified by CSS.
Wednesday, July 22, 2009
Padding Error -- Created by Yubis IT Solutions

This is how the tablized images appear like splitting apart!!
In the old days, a whole image used to be tablized/split into tiny pieces of images. It's really had to work it like that. In Drupal, we found that the tablized images will have "padding error", in which sense the images will just appear to be splitting apart even though no CSS is inserted. This only happens with the browsers of the new standard, not those in the old days (e.g. IE6/7)
There's a little bit of history. In the old days though not too long ago, websites are not confined to W3C standard. But then, when this standard appeared, the browser vendors had a tough choice. Option 1 is to follow strictly the standard, but this makes the website look bad. Another option is to please the design while giving up the standard.
So, 2 main modes emerged: quirk and strict. Quirk mode (old versions of IE like IE6/IE7) supports those old design, while strict mode (newer versions of IE, Firefox) supports the W3C standard and follows strictly to it.
Tablized images are really old-fashioned, and so problems occur in strict mode. The simplest solution is to force the browser to run in quirk mode. To do this, add an img tag of style: block
Of course, the easiest way to get rid of it is avoid using tablized images.
Ref: http://www.quirksmode.org/css/quirksmode.html
Friday, July 3, 2009
Tools may help on customizing theme
CopyRights Reserved by Yubis IT Solution
These are very useful tools for you to trace the html code to find out the classes of element, in order to customize your design.
For FF:
Firebug:
download link: https://addons.mozilla.org/zh-TW/firefox/addon/1843
For IE:
Internet Explorer Web Developer Tools
download link: http://www.microsoft.com/downloads/details.aspx?FamilyID=E59C3964-672D-4511-BB3E-2D5E1DB91038&displaylang=en

These are very useful tools for you to trace the html code to find out the classes of element, in order to customize your design.
For FF:
Firebug:
download link: https://addons.mozilla.org/zh-TW/firefox/addon/1843

For IE:
Internet Explorer Web Developer Tools
download link: http://www.microsoft.com/downloads/details.aspx?FamilyID=E59C3964-672D-4511-BB3E-2D5E1DB91038&displaylang=en

Saturday, June 6, 2009
Install Slideshow Creator - Created by Yubis IT Solutions
Modules Needed:
1. Slideshow Creator -
dl link: http://drupalmodules.com/module/slideshow-creator
2. jQuery_plugin -
dl link: http://drupalmodules.com/module/jquery-plugins
Steps(Using drupal 6.x):
1. Site Configuration => Input format=> Configure => Tick SlideShow
2. Create a page => insert codes example in reference below to the "Body" section
Sample Code(for Testing):
To create a directory for images included in the slideshow:
(suppose the images placed in www\drupaltest\sites\default\files\frontpage_slideshow)
Other attributes can be shown in the README.TXT
Reference:
README.TXT in the module folder
Reference Link:
http://blog.csdn.net/bright60/archive/2009/01/04/3702890.aspx
1. Slideshow Creator -
dl link: http://drupalmodules.com/module/slideshow-creator
2. jQuery_plugin -
dl link: http://drupalmodules.com/module/jquery-plugins
Steps(Using drupal 6.x):
1. Site Configuration => Input format=> Configure => Tick SlideShow
2. Create a page => insert codes example in reference below to the "Body" section
Sample Code(for Testing):
[slideshow: 2, img=|http://drupal.org/themes/bluebeach/logos/drupal.org.png|drupal.org|Drupal|The ultimate CMS. Download it now!|Drupal|, img=|http://www.mysql.com/common/logos/mysql_100x52-64.gif|http://www.mysql.com|MySQL|Free and reliable SQL server and client.|_self|, dir=|files/|yes||Generic Photos|Arent they great?||]To create a directory for images included in the slideshow:
(suppose the images placed in www\drupaltest\sites\default\files\frontpage_slideshow)
[slideshow: 2, rotate=6, blend=3, dir=|/frontpage_slideshow/|yes||Generic Photos|Aren't they great?||]Other attributes can be shown in the README.TXT
Reference:
README.TXT in the module folder
Reference Link:
http://blog.csdn.net/bright60/archive/2009/01/04/3702890.aspx
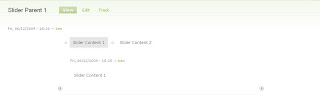
Install Slider - Text
Modules Needed:
Slider - dl link: http://drupalmodules.com/module/slider
Steps(Using Drupal 6.x):
1. Install modules
2. Add content type:
Administer => Content Management => Content Type => Add
Slider Parent Node (slider_parent_node) , Slider Content (slider_content)

3. Slider Parent Node Configure => Add field =>
slider_content(Type:node_reference, configure=>Tick Slider Content)
4. Site Configuration => Slider => Tick Slider_Parent_Node
5. Create content => Slider content => type sth like what you do in a pag
6. Create content => Slider Parent Node => like Step 5 but highlight the slider content node to be included in "input format" section
7. Finish
Other Example: http://www.yubis.net/

5. Create content => Slider content => type sth like what you do in a pag
6. Create content => Slider Parent Node => like Step 5 but highlight the slider content node to be included in "input format" section
7. Finish

Other Example: http://www.yubis.net/

Subscribe to:
Comments (Atom)